
Photoshop Knowledge 1-10 --1 being a beginner, 10 being a pro: 5 (you have to know a couple of photoshop buttons and icons; for example, frames, layers, animation window... etc)
P.S CLICK THE PICTURES TO ENLARGE AND SEE BETTER
Okay, let's begin!
Step 1: open three (or more/less) pictures you want to use
I'll use these three from Emma Watson's photoshoot

Step 2: click CTRL-N and and set your width to 500px and select a height. Usually, gifs don't work unless they're below 600px in height.
for this example, my settings are 500px in width and 600px in height.
So, size and move your pictures where you want them to be

Step 4 (optional): add a colouring or a PSD.
in this example, I'm using two of my pre-made PSDs which can actually be found for download in my resource PSD page

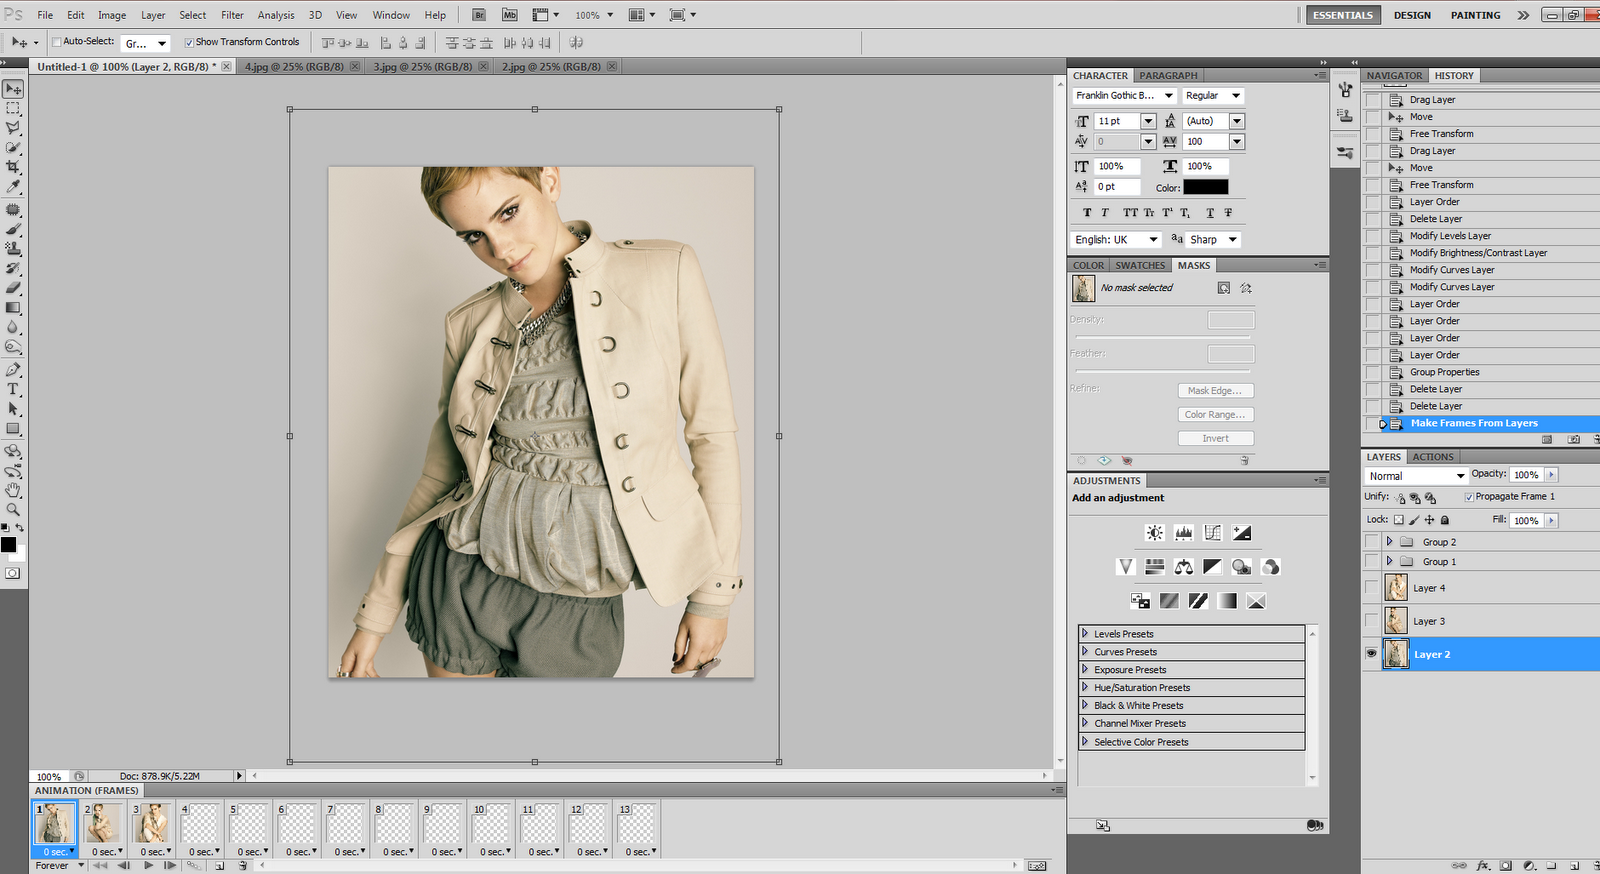
Step 5: after you add your colours, open your menu in your animation window

Step 5: click "Make Frames From Layers"

Step 6: you might have some excess frames on your animation if you added a colouring. Click the first excess frame, hold the shift key, and click the last excess frame to highlight them blue
Step 7: Now that they're highlighted, click the small trash icon button on the bottom of the animation window to delete the extra frames. do not click the actual delete button because that'll delete layers and not frames

Step 8: after you click the trash icon (circled on bottom) click yes

Step 9: make sure that if you did add a colouring, that all your 'eyes' on your colour layers are on. To do this, click the first frame, open your PSD colouring, and have all the eyes checked like the picture below

Step 10: if you want, click the drop down arrow on your colouring layers to hide them (the squares on the layers panel)
Now, to start the fading! Make sure that you have the first frame selected like the arrow is showing on the bottom. Then, click the tween button on the bottom icons of the animation window (in a circle at the bottom)

Step 11: a new window should pop up, on the top saying tween.
Where it says "Tween With", make sure you have Next Frame selected.
Where it says "Frames to Add", pick a number between 1-5.
I pretty much always just use 2, and for this example, I'm also using 2. Then click OK

Step 12: Do the same thing for your next frame.
Remember that you now have 2 frames in between your original frames, so your next click should be named 4
Now, click the next frame (which in my example is my last frame) click the tween button, and now make sure that you have "First Frame" selected, and not "Previous Frame" like the arrow is showing below

Step 13: If you used three pictures like I did, you should now have 9 frames in total. Now, click the first frame, hold your shift key, and click the last frame to select all your frames

Step 14: click the delay time icon on the bottom of the last frame as shown below. And pick a time that you want the gif to delay.
For this example, I used 0.2 seconds

Step 15: Now, we're going to add our watermark! So, make sure that you now have the first frame selected, your last layer selected, and then click the new layer icon on the bottom of the screen shown by the third arrow

Step 16: After you add a layer, just make sure that you have something checked first... Click the menu button on your animation window and make sure to click and have checked "New Layers Visible In All Frames"
 Step 17: After you know that's checked, click "T", or click your Type Tool on your tools menu. Type your URL, using whatever font and font size you want. make sure you have the first frame selected before you type anything
for this example, I'm using 12 size font, and the font Ernest

Step 18: Move the URL around where ever you want it to be. Now, we can mess with the opacity! Make sure you have the first frame selected and then have the opacity of the URL to 50%, and the fill to 50% (it is squared in red in the picture)
for this example, mine is turned counter-clockwise on the left of the picture

Step 19: Now we can save! You can either click CTRL-SHIFT-ALT-S or go to File then Save for Web & Devices (like the arrow)

Step 20: a window should pop up labeled Save for Web & Devices. Now, click the drop down menu for this window (a square in red)

Step 21: now click "Optimize to File Size" (like the arrow)

Step 22: where it says, "Desired File Size", write 500, then click OK

Step 23: Sadly, the quality might go down :( But you can always mess with the settings on the right side of this window! Make sure that your this is a gif and it's below 500K. In the square in red below, make sure that your screen also says GIF, and a number below 500K. Then click SAVE
(My settings always stay on Selective, and Pattern

Step 24: Now, pick a folder, name your gif, and click save

After you've saved everything, go to tumblr, click new photo, select your new gif, then upload it!
My finished gif looks like this:

The End!
hope this helped! If there are any questions about this or if you would like to request any more tutorials, message me in my ask box