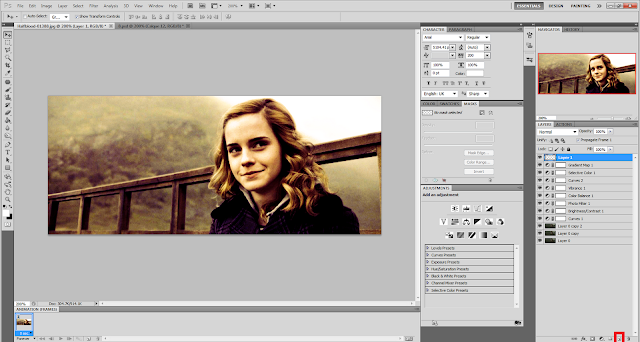
Photoshop Knowledge 1-10 —1 being a beginner, 10 being a pro: 4 (you have to know a couple of photoshop buttons and icons; for example, frames, layers, animation window... etc)
P.S CLICK THE PICTURES TO ENLARGE AND SEE BETTER
Okay, let's begin!
Step 1: Open up a screencap that you want to use. I'm going to use this Hermione Granger screencap from HP+Order of the Phoenix
Step 2: Click the window button, then make sure you have the "Adjustments" checked
Step 3: This window should pop up
Step 4: (optional) drag that window somewhere off to the side. Now, click the Curves button (small square in red)
Step 5: When you move the curve up, it brightens your screencap
Step 6: When you move the curve down, it makes it darker
Step 7: If you move one side up, and one side down, it works with the contrast of the screencap
Step 8: But for this PSD, I'm just going to move my curve just a little bit up so my screencap can be a little brighter
Step 9: Now go back to your adjustments by clicking that little arrow on the Adjustments window. Then, click Brightness/Contrast (squared in red)
Announcement: In any PSD, you seriously just need to mess around with the settings with whatever looks best with the screencap and whatever you like
Step 10: for this PSD, I'm just going to move up my brightness and move up my contrast
Step 11: go back to your adjustments, now click the Photo Filter
Step 12: for this one, you can pick whatever you'd like that looks best with your screencap.
Step 13: I gave mine a nice warming colour. You can still move up the density, and mess around with the settings
Step 14: go back to the adjustments, and click the Colour Balance
Step 15: mess around with the settings to your liking. Shown in the first red arrow, you can move those up and down. Shown in the blue arrow, you can click each one of them and mess with the settings. In the second smaller red arrow, you can check or un-check that to your liking.
Step 16: go back to the adjustments, and click the Vibrance
Step 17: shown in the red arrow, you can move the settings up or down
Step 18: go back to the adjustments, and click Curves once more
Step 19: mess with your curves again! I brought mine back up to brighten the picture again because it was getting a little dark with colour
Step 20: go back to your adjustments and click Selective Colour
Step 21: shown in the red arrow, you can move around your settings to your liking
Step 22: go back to your adjustments, and click the Gradient button
Step 23: the picture may look weird like mine now. Click the actual gradient where my red arrow is showing
Step 24: the Gradient Window should pop up. Click whatever gradient you think would look nice with your screencap
Step 25: I chose this purple/yellow gradient, but I edited it before I clicked okay. You're always free to edit your own gradient
Step 26: now, click the drop down menu (Layer Blending) that I have in red, and pick anything that makes the screencap look good for you
Step 27: For mine, I picked Soft Light and I messed around with the opacity of it, leaving it at 80%. (where my red arrows are)
Step 28: click the screencap layer again, and then click Ctrl-J to make a copy of the layer.
Step 29: click the Layer Blending again and set it to Screen
Step 30: click your original screencap layer again and click Ctrl-J again. Drag that second copied layer to the top of the screencap layers
Step 31: set that layer blending to Soft Light
Step 32: now, click the new layer button (squared in red)
Step 33: click the Gradient tool on your tools bar. (squared in red)
Step 34: make sure you have your original colours on. (That's supposed to be Black on top and White on the bottom. To change that, just click it and set the colour)
Step 35: Drag your mouse on your screencap as shown
Step 36: mess around with your gradients yourself. For this example, I put a white gradient on top and a small black gradient on the bottom
Step 37: now back to your layers. Click the first layer (NOT YOUR SCREENCAP LAYERS) hold your shift key, and click the last layer.
Step 38: Click Ctrl-G to put all those layers into a group
Step 37: you can double click that layer to rename your group
And there you go! Your PSD is done!
Before:
After:
The End!
hope this helped! If there are any questions about this or if you would like to request any more tutorials, message me in my ask box


