Photoshop Knowledge 1-10 —1 being a beginner, 10 being a pro: 5 (you have to know a couple of photoshop buttons and icons; for example, frames, layers, animation window... etc)
P.S CLICK THE PICTURES TO ENLARGE AND SEE BETTER
Okay, let's begin!
Quick message: This tutorial is using pre-made gifs. For a tutorial on how to make a gif click here
Step 1: first, open up photoshop
Step 2: now, open (Ctrl-O) up the gifs that you've already made in whatever folder you have it saved under.
Step 3: I've opened up 4 random gifs that I've made before
Step 5: Now you should have a new canvas with your new width and height
Step 6: Now, go to your first gif, select all the frames by clicking the first frame, holding shift and then click on the last frame. Now, select the drop menu on your animation window (where my arrow is)
Step 7: Now click Copy Frames
Step 8: Go to your new canvas, click on that same drop menu and then click Paste Frames
Step 9: When a pop up window comes up, select the second option (where my red rectangle is) then click okay
Step 10: Your full gif should be in the new canvas
Step 11: Click the first layer on your Layers Tab (where my red rectangle is), hold shift and then click the last layer to have all the layers selected
Step 12: When everything is selected like my picture is, make sure that button on the top (where my red arrow is) is selected so you can move around your gif
Step 13: To keep your proportions the same, hold shift, and move around the gif to fit the entire canvas size
Step 14: Now go to your next gif that you want to add and do the same things you did last time. Select all of your frames, click the drop menu, and click Copy Frames
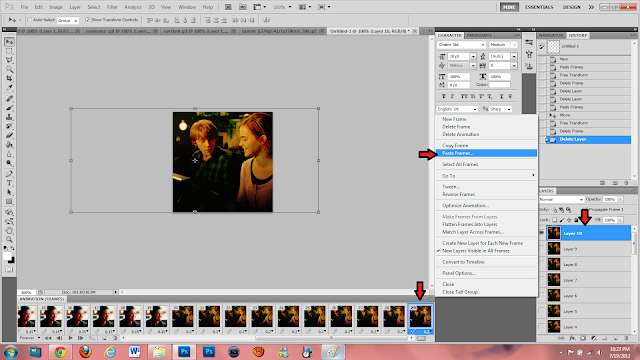
Step 15: Go to your new canvas. Now this is where it gets different than last time. Make sure that you have the last frame selected and the last layer selected (where my red arrows are)
Step 16: Click the drop menu and click Paste Frames
Step 17: When the pop up window appears, make sure you click the last one (where my red rectangle is) or else everything will be messed up then click okay
Step 18: Your gif should appear on the new canvas after the first gif
Step 19: To move around the gif, you do the same as the first one. (Steps 11-13)
Step 20: Now your gif should fit the canvas
Step 21: Now go to your next gif, select all frames and click the drop menu and click Copy Frames
Step 22: Go to your new canvas, select the drop menu and click Paste Frames
Step 23: With the pop up window, make sure the last selection is selected (haha)
Step 24: Now your gif should appear on the new canvas
Step 25: Go to your last gif, (I only have 4, but you might have more so keep copying and pasting until you reach your last one) and do the same as you've been doing! Select all your frames, click the drop menu and click Copy Frames
Step 26: Go to your new canvas, make sure your last frame and your last layer is selected! Click the drop menu and then click Paste Frames
Step 27: with the pop window, click the last selection
Step 28: now your new gif should be on your canvas
Step 29: to move it, do the same as you've been doing! (Follow steps 11-13)
Step 30: After you've finished putting all your gifs into your new canvas, now to fix the timing! Click the drop menu and then click Select All Frames
Step 31: See that little black arrow? Click that (where my bottom red arrow is) and then choose a time for all the gifs so they can be the same time. I usually choose "0.15". You can just click Other and then type in a time like I did
Step 32: Personally, I like all my fandoms to be around the same number of frames. I usually do 10 frames per fandom so it can be pretty equal. To delete any frames, select any frame you want and then do not click delete only click the small trashcan (where my red arrow is)
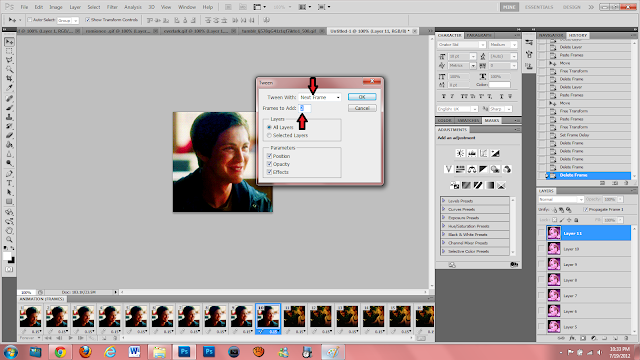
Step 33: Now to mix them up! Click the last frame of a fandom (like I did) then click on the Tween button (where my red arrow is)
Step 34: a pop up window will pop up, and you can now select how many frames you want in between your fandoms. I usually do 2 (where my red arrow is). Make sure the drop down menu is saying Next Frame then click okay!
Step 35: You should have two faded looking gifs in between your fandoms
Step 36: Do the same for the next fandom. (Steps 33-35)
Step 37: And again for the next one (Steps 33-35)
Step 38: Continue doing that until you read your last frame. Now for the LAST fandom, when you click the Tween button and the pop up window comes up, make sure that you have First Frame selected on the drop down menu (where my red rectangle is) then click okay
Step 39: Now to watermark this. Select your first frame and your last layer (as shown)
Step 40: Click the Typing Tool (T for a keyboard short) and click where you want to type on your gif
Step 41: Type what you want, then click on the check mark on top of the screen (where the arrow is)
Step 42: Now to move the watermark, click the Move Tool (V for a keyboard short) and move it where you want it
Step 43: I like my watermarks faded and almost transparent. To do that, you can mess around with the Opacity & Fill settings on top of the layers tab (as shown in both red arrows)
Step 44: I chose 40% for both, but you're welcome to choose your own number of course
Step 45: Now you can add a colouring! I just chose one super quickly and added it to the top of my layers. (If you don't know how to add a colouring and want to learn how, ask me and I might make another quickie tutorial;; if you don't want a colouring, then this is totally optional of course)
Step 46: Now you're ready to save! Click File > Save for web and devices (Shift-Ctrl-Alt-S for a keyboard short)
Step 47: a window should pop up and then you can mess around with the settings there or just click save (where the red arrow is)
Step 48: Now choose the destination of your new gif, type a new name and click Save!
The End!
Here is your finished product: (I never fixed the sharpness and colours of some, and that's why it may look so choppy, but your gif should look just fine!)


No comments:
Post a Comment